How to set up conversion tracking at CPV Lab Pro and then connect it with RichAds?
Here’s a detailed step-by-step guide on setting up postback integration at CPV Lab Pro!
In this article we will show how to set up conversion tracking in CPV Lab Pro, and connect an advertising network, affiliate network, CPA offer and create tracking campaign.
Get bonuses from CPV Lab Pro with promocode RICHADS:
14 days free trial, 25% off monthly plans for 2 months, 10% off yearly plans for 1 year, 10% off lifetime plans.
What is a postback integration?
Postback, or S2S (server-to-server) postback — is a way of tracking data of actions performed on different platforms. For example, it can connect the data collection from affiliate networks and ad networks, sending it to a tracker. Then the tracker preserves the gathered data in one piece, for example, conversions from CPA networks and data on traffic sources from ad networks. Thus, integrated postback allows to properly analyse ad campaign data without switching tabs and trying to figure out which end was from.
With the scope of postback gathered data it’s possible to optimize and narrow targeting parameters for your ad campaign. Also integrated postback unlocks the usage of unique platform features. For example, at RichAds connecting with postback allows launching ad campaigns in TargetCPA mode, which provides better optimization on traffic sources and getting the most conversions within the budget and desired CPA. Also after a postback integration it unlocks using Automated rules feature to set specific conditions for traffic sources by which they will be sorted into either whitelist and blocklist automatically.
The offer shown in the article has been given by an affiliate network. If you want to set up your own CPA offer, contact the tracker’s support for help. They will guide you with postback integration and peculiarities of it.
RichAds team
How to set up conversion tracking at CPV Lab Pro: step-by-step guide
Now we will show you how to set up CPV Lab Pro integration with RichAds ad network, affiliate network and the offer for your ad campaign!
What will be in the guide:
- Connecting RichAds with CPV Lab Pro
At this step, we will show how to add RichAds as a traffic source at CPV Lab Pro. That’s needed to provide the tracker with access to information on the ad campaigns traffic sources. - Connecting an affiliate network to CPV Lab Pro
This step is to connect the data collection on the affiliate network side to CPV Lab Pro. That’s required to get affiliate network data on the offer and redirect it to CPV Lab Pro. - Setting up an offer for tracking at CPV Lab Pro
At this stage, the CPA offer will be connected to conversion tracking at CPV Lab Pro for direct data share. That’s to back-up data given by affiliate networks and ad networks. - Creating tracking campaigns at CPV Lab Pro
At this step, we will show what needs to be done in order to get all of those sources connected into one tracking campaign.
Important!
To ensure everything works intact after setting up — follow the instructions step-by-step in the same order!
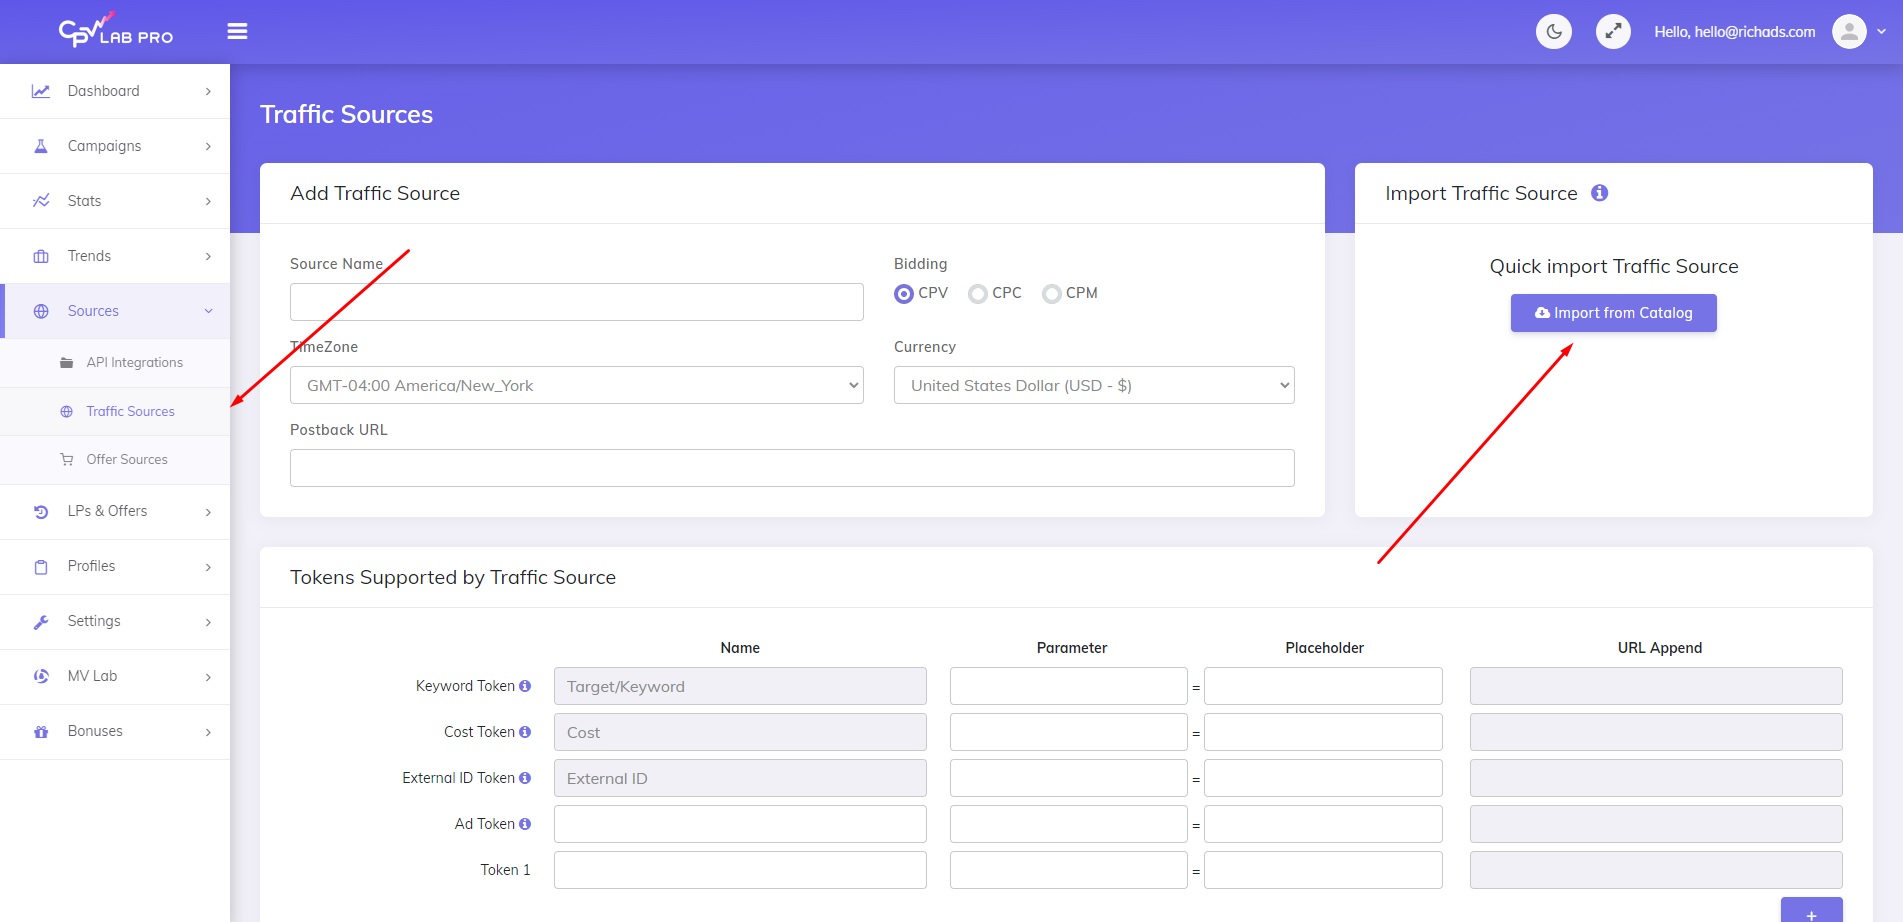
Step 1: How to add an ad network to traffic sources at CPV Lab Pro tracker
First, you need to connect the tracker to an advertising network. We will show this on example of RichAds ad network. Here’s how to do it:
1. Import a traffic source at CPV Lab
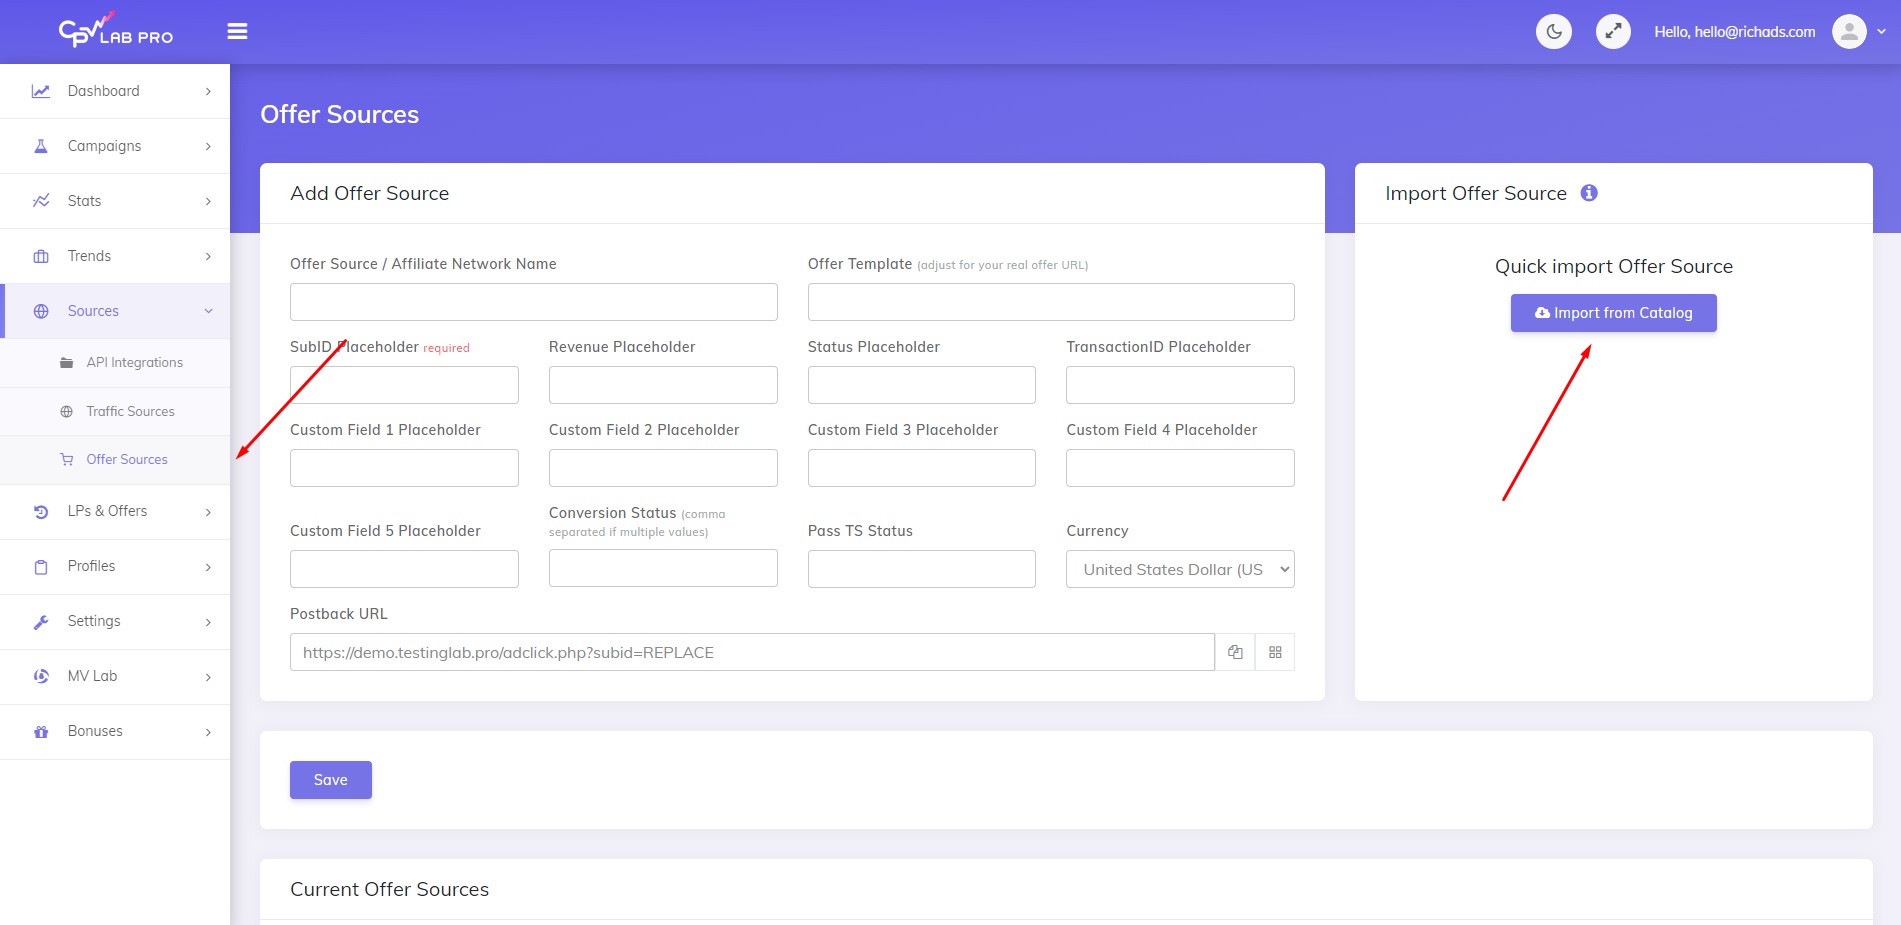
Find the “Sources” tab in the tracker’s left panel, then proceed and then click on the “Import from catalog” button.
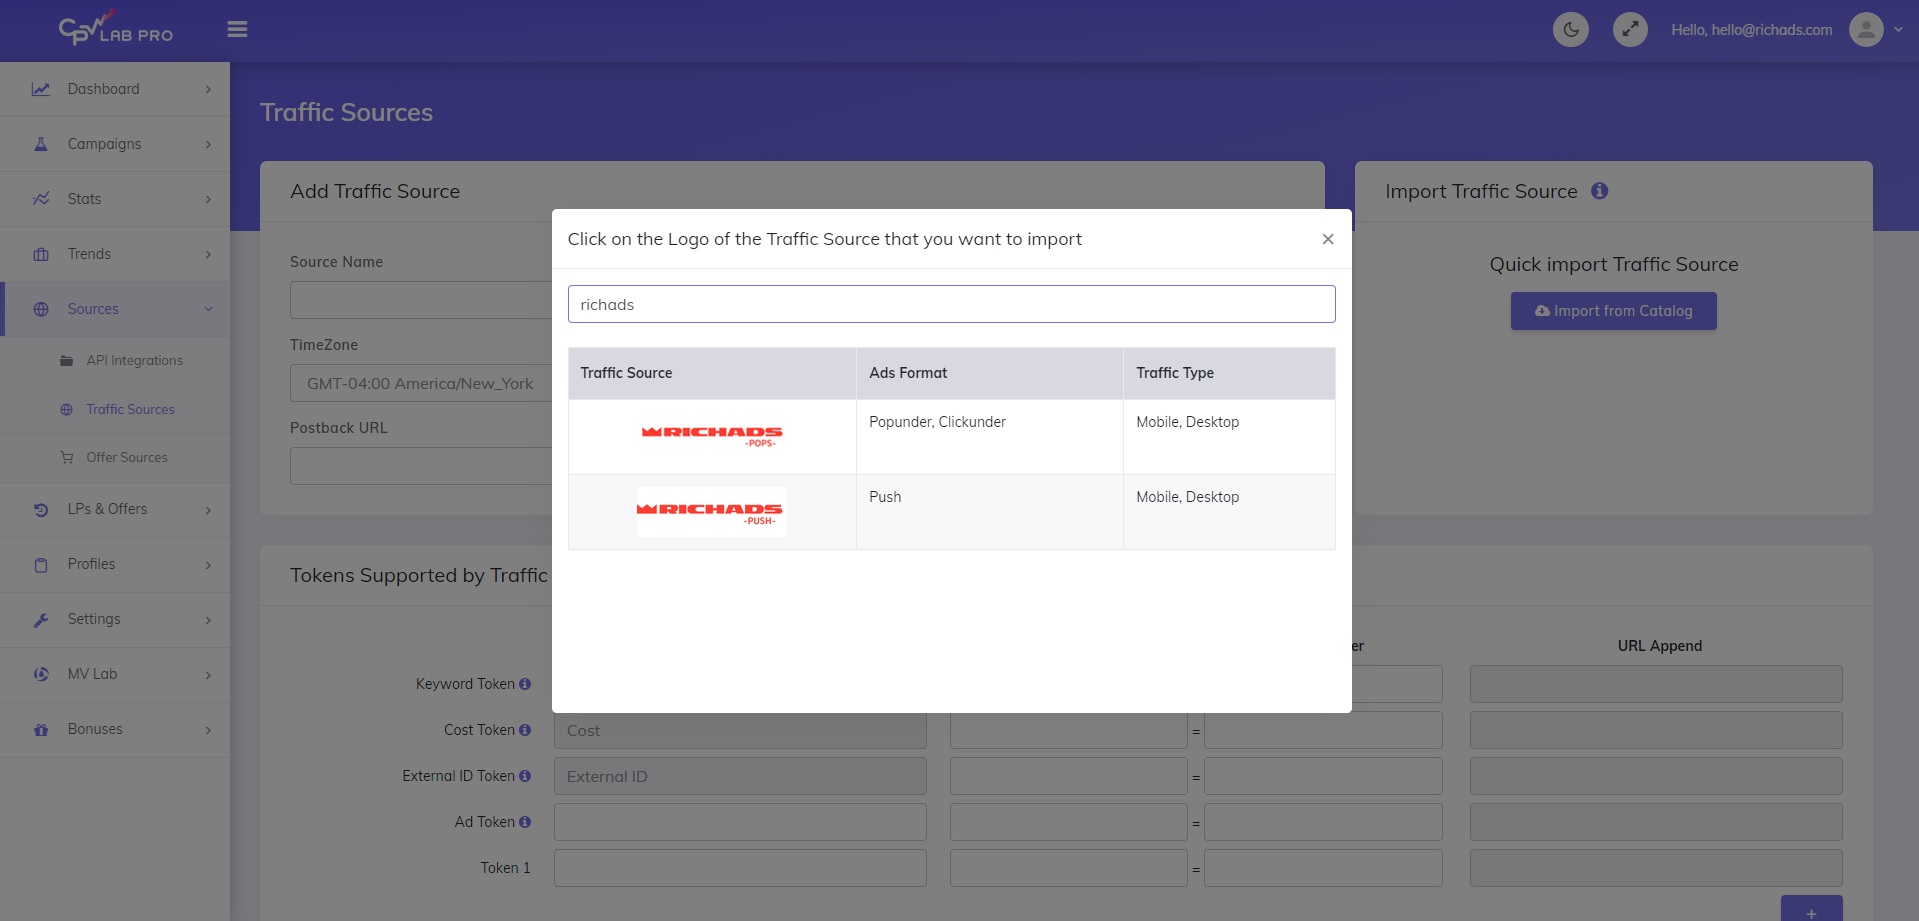
2. Find RichAds in the catalogue
Type “RichAds” into the search bar and select your traffic type (push or pops) from the list by clicking on the logo.
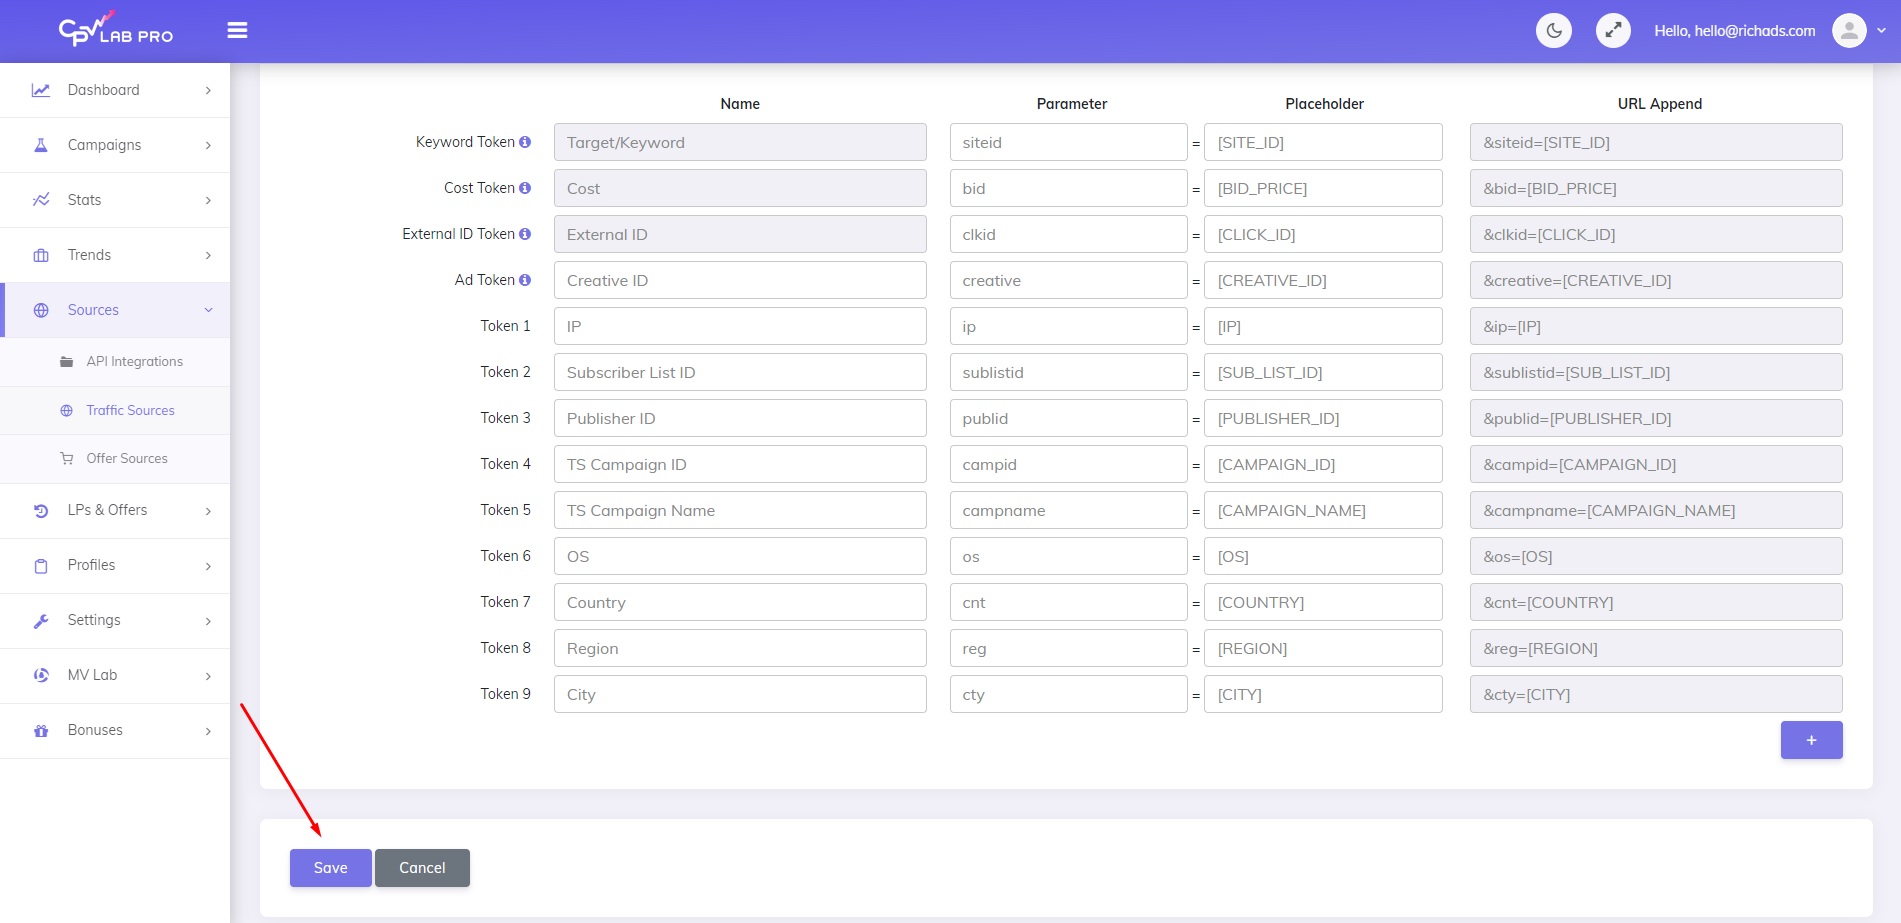
3. Save changes
In the newly opened window, scroll down and press “Save” button to save changes.
This completes the connection of the traffic source to the tracker. The next step is integration with the affiliate network.
Step 2: How to integrate an affiliate network with CPV Lab Pro
Let’s get to the connecting CPV Lab with an affiliate network. CPV Lab Pro tracker is integrated with many affiliate networks, so you can find most of them in the list of templates.
1. Import an offer source at CPV Lab Pro tracker
Find the “Offer sources” tab in the tracker’s panel on the left, then click “Import from catalog”.
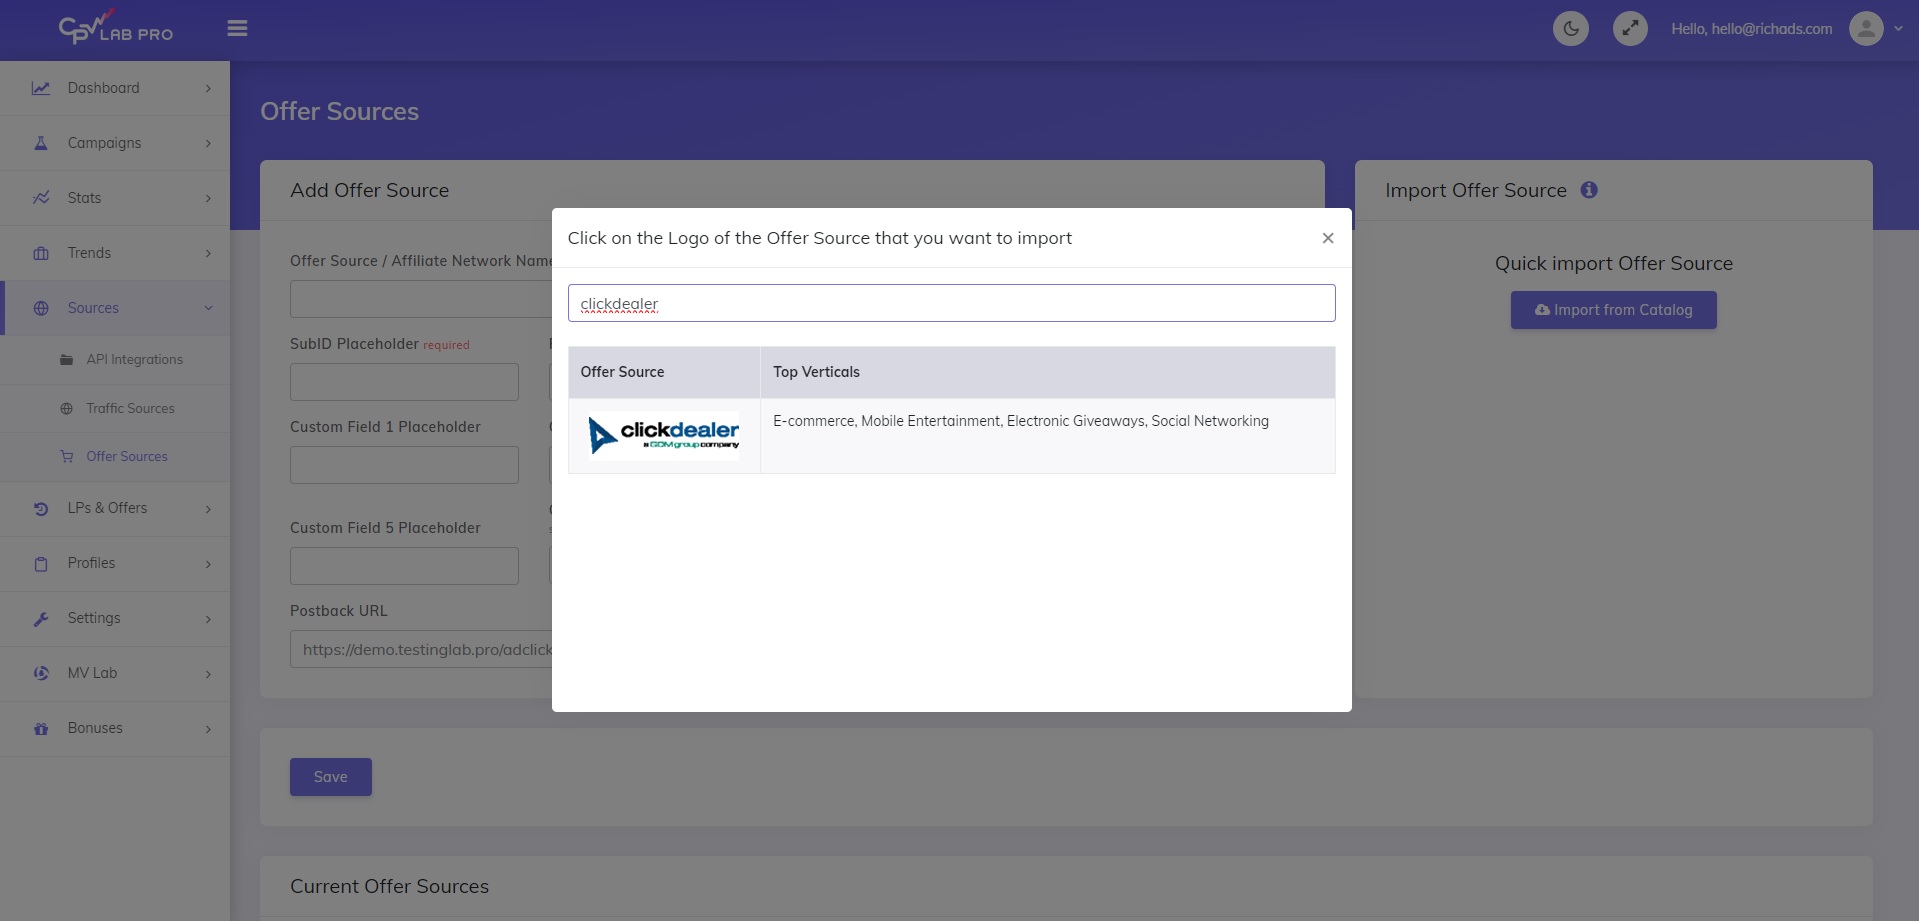
2. Find the affiliate network
Start typing the of the affiliate network in the search bar, in our case it’s ClickDealer, then select it by clicking on its logo.
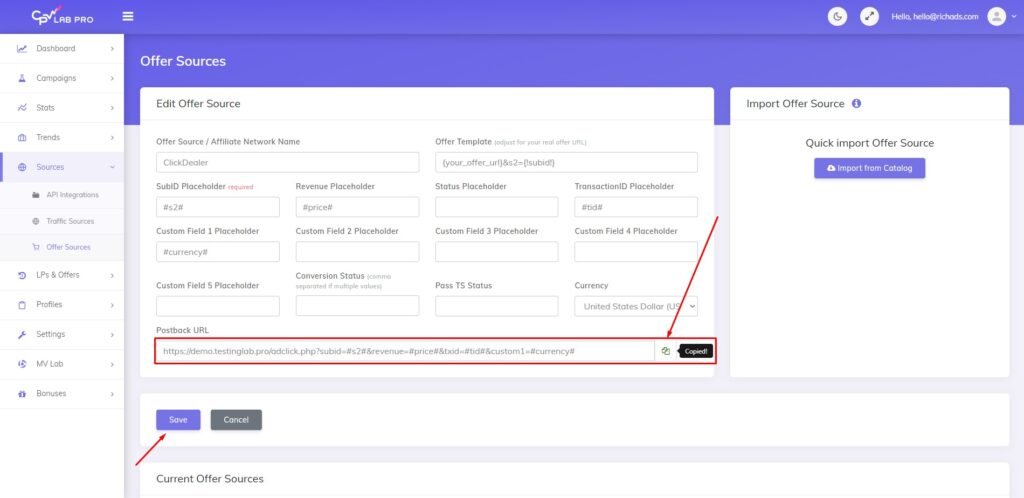
3. Get the postback URL and save changes
In the newly opened page, copy the “Postback URL” field to enter it in your CPA-network’s account, then press “Save” button to save changes.
So, we have connected the affiliate network to the tracker. The next step is to add offers. Let’s get into this then!
Step 3: How to add an offer to CPV Lab Pro tracker
Warning!
For this step we’ve shown an offer we’ve got from an affiliate network. In your case the CPA offer set up process might vary from the one we’re about to show. It’s recommended to contact the BeMob tracker’s support for help to set up your offer.
Let’s set up the offer and connect it to CPV Lab Pro. We will show the process by example of “ClickDealer” affiliate network’s offer. To integrate CPA offer with the tracker, you need to:
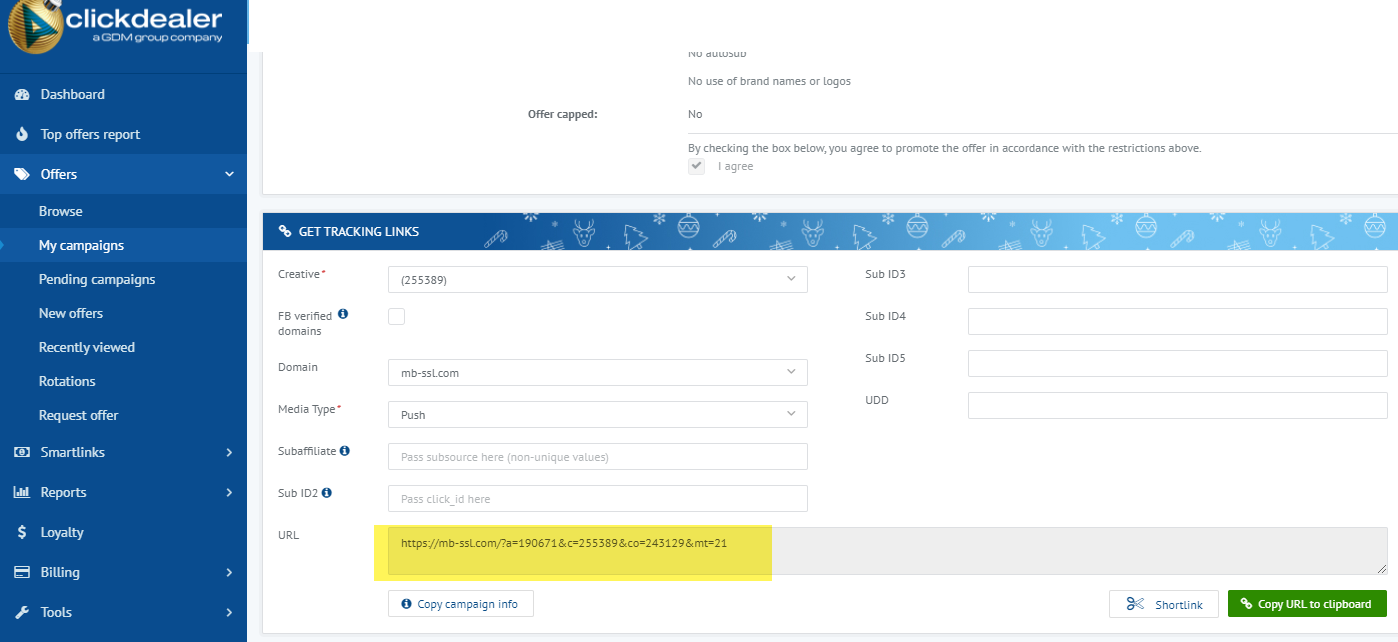
1. Find an offer in the affiliate network
In your affiliate network get to the page with offers, choose one and copy the URL link, then save it.
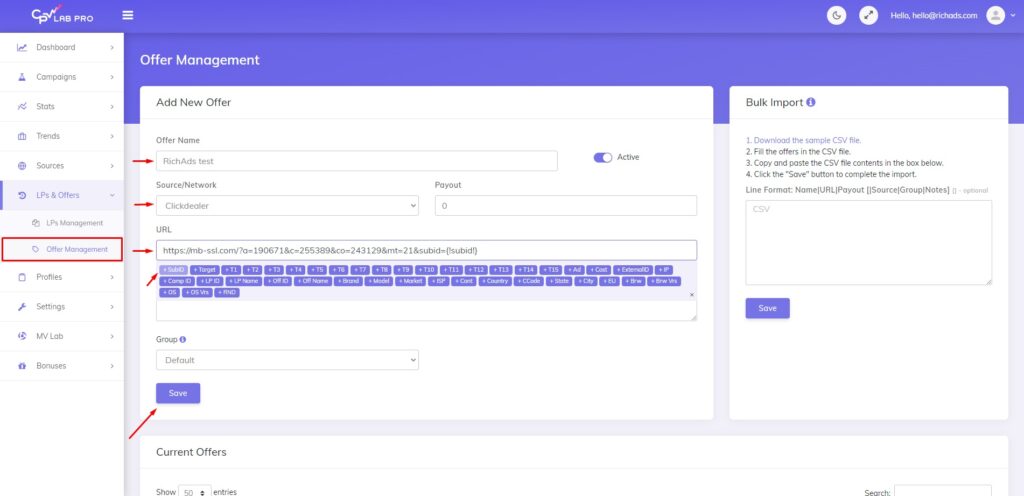
2. Add an offer to CPV Lab Pro
In the CPV Lab tracker you need to find “LPs & Offers” tab in the tracker’s menu, then select “Offer management”. After that specify the offer’s name, offer’s source/network (in our case it’s ClickDealer), and paste the postback URL. Then click on the “+SubID” button, so that it adds the token to the link.
Make sure, everything is intact, then press “Save”.
This completes the integration of the offer. After that you need to create a tracking campaign. Let’s figure out how to do it in the next step.
Step 4. How to create a tracking campaign at CPV Lab Pro
To unite all the connected sources, you need to create a tracking campaign at CPV Lab. To do that, you need to:
1. Add a new tracking campaign at CPV Lab tracker
Find the tab “Add a new campaign” in the tracker’s panel, then choose a campaign type (in our case we picked “Direct link & Landing pages”.
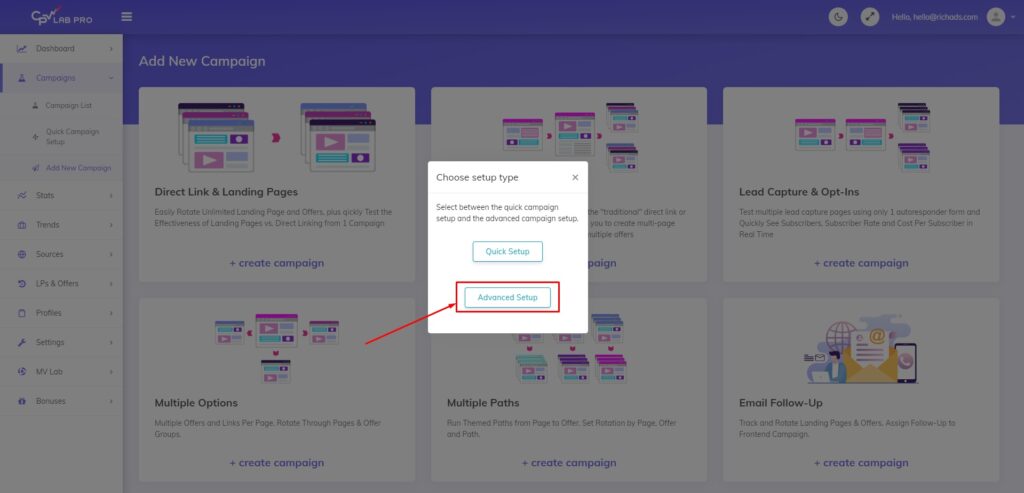
2. Choose the tracking campaign’s setup type
After that you will be shown a window to pick the campaign’s setup type, we selected “Advanced setup”.
3. Specify general information
In the opened page, at first select the campaign’s name, data options, redirect type and campaign type.
4. Specify the traffic source information
Then scroll down to this part, and specify the campaign’s traffic source, in our case it’s RichAds, along with tokens.
5. Specify the landing page information
After add your landing page or landing pages and setup the share for each of them (the share% means what % of your traffic you want to send to that specific landing page). It is useful for split testing.
6. Specify the offer information
Once you have your landing pages added, then go and select your offers you added in CPV Lab, then select the offers from the dropdown and setup the shares % for them in this campaign.
7. Specify the campaign’s URL
Scroll down to the “Links & pixels” part of the page, then copy the “Campaign URL” field and save it. Also mark checked the “Use traffic source postback URL” to ensure that information about your conversions is sent back to the traffic source.
After everything is done, press “Save” lower down the page to save changes.
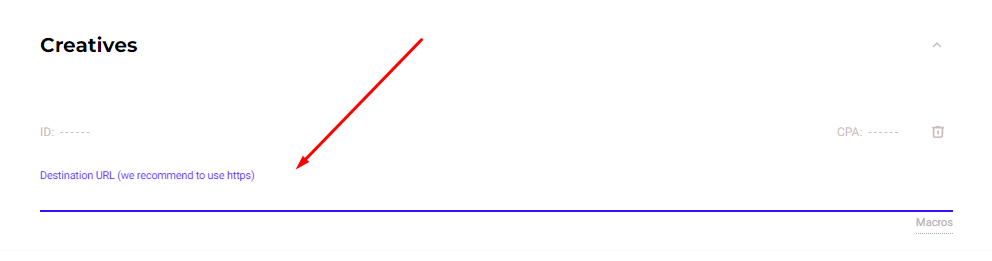
8. Paste the campaign URL at RichAds
Then proceed to RichAds, and enter the “Campaign URL” from previous point into “Destination URL” field.
What benefits does a postback integration give at RichAds?
Apart from obvious benefits such as getting actual data from several platforms in one place there are some more advantages following. At RichAds platform a postback integration grants you access to services and features, which can perform only with back-up by postback tracking.
With RichAds connected to postback you get access to:
- TargetCPA mode
Launching campaigns in TargetCPA mode is the option that allows you to get better optimization on traffic sources and target parameters. The mode is perfect to try to get as many conversions as possible within the ad campaign budget and desired CPA. - Set up Automated rules for your ad campaign
With the help of Automated rules you can set specific criterias for traffic sources, by which they will be sorted into either whitelist or blocklist automatically. You can set criterias based on how converting or non-converting the traffic sources are according to desired CPA. - Set up Micro bidding for your ad campaign
The Micro bidding feature allows you to set custom bids for particular targeting parameters of your campaign. For example, you can set a lower bid on a certain targeted device or region, which would potentially save the budget draw. - Thorough assistance from RichAds’ managers
If the RichAds support team can see the data on conversions of your ad campaign from different angles, they would be able to provide an even more quality help. As managers can help you set up optimal bids, Automated rules and targeting options.
If you want to get similar detailed guides on connecting other trackers, then check our tag “Affiliate tracking tutorials“!
Conclusion
Affiliate marketing trackers provide users with opportunity to improve monitoring their campaigns by connecting all the sources to an all-in one data exchange process. The postback setup at CPV Lab Pro is basically a simple process of connecting an ad network, affiliate network, and CPA offer, one-by-one. Then, to unite them up in a single flow, a tracking campaign setup required.
We at RichAds have known many ways to improve ad campaigns’ results, and a postback integration is among the most effective. To test that, you can launch an ad campaign at RichAds on five powerful ad formats, and over 220+ geos from Tier 3 to Tier 1! Start making profits with quality traffic by RichAds!
What is RichAds?
🔝 High quality push and pop ads,
🔼 domain redirect and native traffic source,
🔝 buy push ads at $0.005 (CPC), pop ads at $0.5 (CPM),
⏫ domain ads costs start from $1.5 (CPM), native ads — from $0.001 (CPC),
⏫ ad network offers large volumes of traffic in more than 200 geos from Tier 3 to Tier 1.