

After setting up a postback, information about campaign conversions is sent to the ad network.
On the RichAds platform, you can configure the transfer of conversions via postback. Postback is the most reliable tracking method.
Read how to create a postback URL in the guide to learn more.
You can read more about what postback, pixel, and image are and how they work here.
Some advertisers refuse to set up postback tracking, fearing that the data about their campaigns could be used for someone else’s benefit. To exclude such cases, RichAds has a rule about non-disclosure of information about client’s campaigns. Also, if you do not want to transmit data about your earnings, you can exclude them from the postback URL.
Note!
Google Analytics is not suitable for tracking data in a push campaign. In the case of push notifications, the click is counted differently than it was intended in this tool. As a result, you lose most of the statistics.
The RichAds team advises using postback for push notifications.
Which bonuses can you get after the postback setup?
First of all, postback allows you to track all the parameters important for an advertising campaign, and then carry out optimization. You can get conversions, but without it, you will hardly be able to make your campaign profitable.
Postback settings make it possible to:
- Track conversion data as accurately as possible.
- Track campaign traffic by various parameters.
- Use the top features of the platform for automatic optimization.
- Get expertise from your account manager to optimize your campaigns.
The most important value of setting up a postback at RichAds is saving your budget and time for optimization. The auto-optimization features can be set up once and will work hard while you are busy with your business.
What can the RichAds platform do for you with help of the postback?
- Assign sources to blacklists and whitelists, disable ineffective creatives, etc. (Automatic rules),
- decrease or increase the bid on certain sources instead of completely disabling them (Micro bidding),
- receive conversions at a favorable price (Target CPA),
- decrease or increase CPC to achieve the appropriate CPA while maintaining traffic volumes (SmartCPC).
Postback settings guide
How to set up a postback at RichAds?
To set up the postback correctly, you need to set up data transfer between the ad network and the tracker.
What do you have now?
Offer URL — link for the offer from the affiliate network
Postback URL — link from the ad network
What do you need to get?
Destination URL is the final link that needs to be added to the ad network.
The main work should be done in the tracker. The tracker will combine the link from the affiliate program and the postback link from the advertising network.
The difficulty is that the ad network and the tracker receive and transmit information using different macros (or tokens). The sense of the postback is to unify the format in which the network is ready to receive data and the tracker is ready to send.
To do this, you need to take 3 steps:
- Take the standard Postback URL from the ad network.
- Add this ad network in the tracker and configure its template (this step is necessary if you are working with an ad network for the first time).
- Create a new campaign in the tracker, select a traffic source, insert a link from the affiliate program there (Offer URL) and get a link that can be put in the advertising account (Destination URL).
What is Postback URL?
A postback URL is a specialized tracking link that automatically sends conversion data from one system to another. It’s used to notify your tracker or ad network that a conversion has happened, without relying on cookies or pixels. Ultimately, a postback URL is a connection between the tracker and the traffic source that allows the sharing of valuable data, such as Click ID, conversion status, payout/revenue, offer ID, and sometimes GEO or device info. See the postback URL example in the next part.
Where is the Postback URL link in the ad network?
Before we’ll create up a postback URL, let’s figure out where the postback link is located in the RichAds advertising network.
- Create a new campaign or enter the settings of an existing one. Find the Tracking block. It follows the block with creatives.
- Select the tracker you are using from the list. We use Bemob.
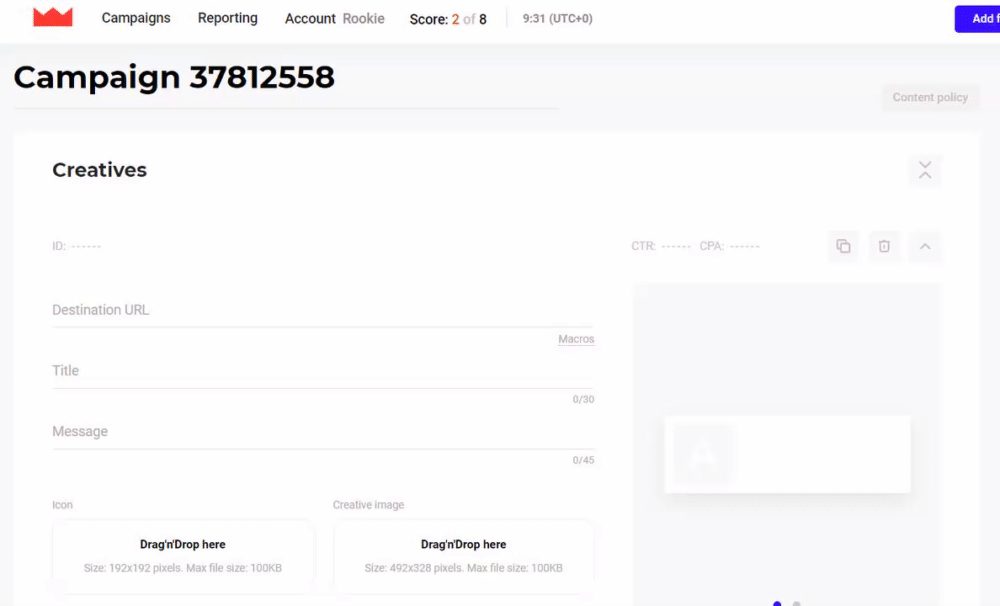
The Postback URL will appear in the box below.
Copy this link.
It will come in handy in the next step when we set up a template for the RichAds ad network in the tracker.
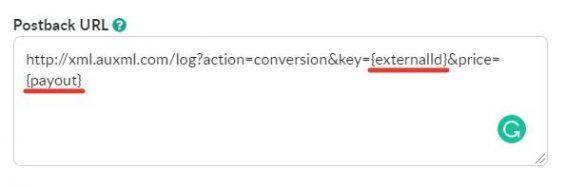
The postback URL example:
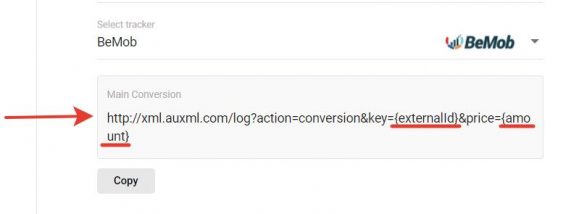
The tokens are underlined in the link, with the help of which the tracker understands what data the advertising network sends to it.
What should you set up in the tracker?
At the very beginning of working with the tracker, you need to configure the template to use a specific advertising network. We will show this using the Bemob tracker.
By the way, RichAds is integrated with many trackers. You do not have to manually compare which macros the tracker sends information to and which ones the ad network receives. In integrated trackers, all macros are already matched in the tracker.
14 third-party trackers are integrated with RichAds, which are convenient to work with large traffic volumes.
Adding ad network to the list of networks used in the tracker
This step needs to be set up once. In the future, you can choose this traffic source when setting up a campaign in the tracker.
- Go to the Traffic Source tab in the BeMob tracker.
- Find the New – New From Template – RichAds button.
- Select the type of traffic you need from RichAds, for example, push.
4. After this, you will see a new window.
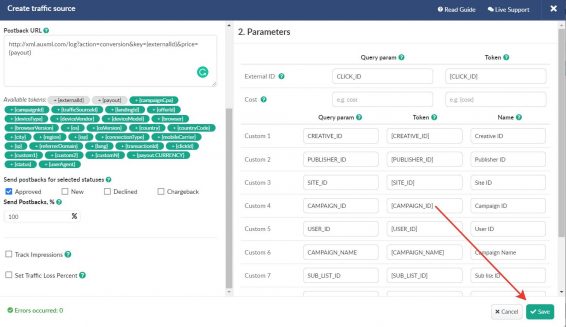
On the left, it already contains the RichAds Postback URL, as we are integrated with Bemob. Also, the tokens that the tracker uses to transfer data (underlined in the link) with the corresponding tokens in RichAds (values in the frame) are already correlated here.
If the tracker was not integrated, you would have to insert the URL from the tracker into the Postback window and manually correlate the tracker macros with the ad network macros.
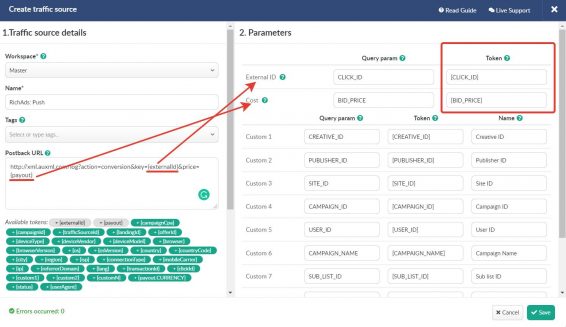
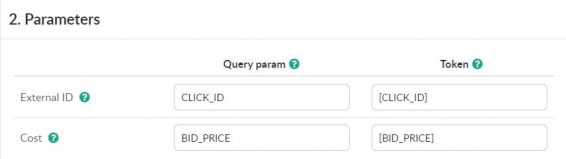
Two parameters are configured here to the side of the ad network by default:
{externalId} from link = [CLICK_ID] – information about clicks,
{payout} from link = [BID_PRICE] – information about the cost of conversion.
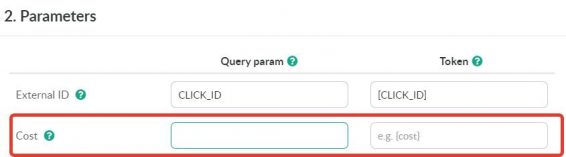
Click information is a required parameter, and the cost per conversion can be hidden from the ad network. To do this, leave the fields in the Cost line blank.
That’s it with the set up of templates in the tracker. Don’t forget to save.
This setting needs to be done once, and it will be automatically filled in when setting up a new campaign in the tracker on RichAds traffic.
How to create a Destination URL for an ad campaign?
To get the Destination URL, you need to create a new advertising campaign in the tracker.
- Go to the Campaigns tab.
- Create a new campaign
Campaigns – New.
Add your campaign name and select RichAds as your traffic source.
3. In the Destinations settings, select the saved integrated advertising campaign from the affiliate program to tracker. How to make this setting, check on the side of the affiliate program.
Save your campaign.
4. In the opened window, copy the first link. This will be the Destination URL.

Please note that the new link contains macros of the type required for transferring data to RichAds (in square brackets with underscores) — [CLICK_ID]
To see the difference compare:
- offer link – http://trgln.com/cpa?oid=hj874827483h534i5o4krllm=f98f9e4f3hgeh24620ae&clickid=4f3hgeh
- offer link with RichAds macros – http://trgln.com/cpa?oid=hj874827483h534i5o4krllm=f98f9e4f3hgeh24620ae&clickid= [CLICK_ID]
The last step in setting up a postback
So, you have set up a campaign in the tracker and now you have a Destination URL.
The only thing left to do is to put a link in the advertising account of the advertising network.
The postback setup is complete!
As you can see, setting up a postback URL is not difficult at all. Especially if the tracker is integrated. If you exclude the steps for setting up a new traffic source in the tracker, then the whole process will take no more than 2-3 minutes. In the future, you can use the top features for automating the optimization process and save a lot of time.
And finally, if you are working with a non-integrated tracker, then the work of matching tokens in the postback link for the tracker from RichAds will need to be done manually.
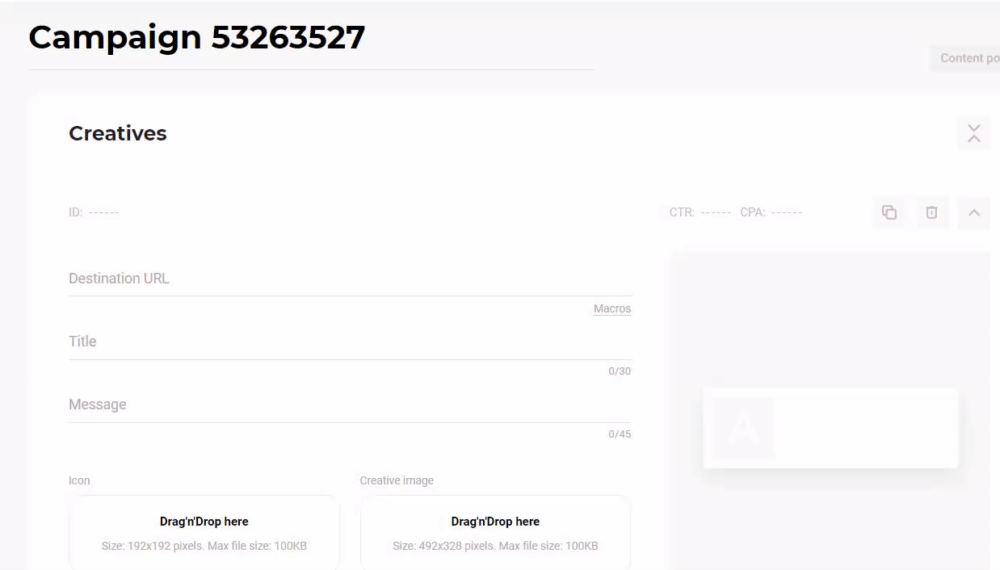
A list of macros available in RichAds can be found in Campaign Setup (Creatives section).

Here is a postback settings guide for you. Additional questions about how to set up a postback will be answered by the RichAds ad network manager.
Also, you can set up an S2S postback like a Pro with the Tracking Wizard option. Learn more about it here.
Step by step video on how to set up S2S Postback
Launch ads with RichAds
What is RichAds?
Ad network for telegram ads,
high quality push and popunder ads,
domain redirect, native and display traffic source,
buy push ads at $0.005 (CPC), pop ads at $0.5 (CPM),
domain ads costs start from $1.5 (CPM), native ads — from $0.001 (CPC),
ad network offers large volumes of traffic in more than 200 geos from Tier 3 to Tier 1.
Frequently Asked Questions about Postback
- What is a postback, and why is it needed?
A postback is a server-to-server (S2S) notification sent from an affiliate network to your tracker when a conversion (lead, deposit, sale, etc.) occurs. It provides accurate, cookieless tracking, ensuring your tracker receives real conversion data. Plus, a postback enables automation features like bidding rules and source scaling.
In RichAds specifically, postback integration unlocks full access to innovative optimization features such as conversion attribution, smart bidding, and accurate ROI measurement.
- How do you set up a postback step by step?
Step-by-step postback integration guide (from RichAds ad network experts):- Generate the postback URL in your ad network.
- Paste that link into your tracker’s “Traffic source” integration field.
- Generate the postback URL in your tracker.
- Paste your tracker’s postback URL into the affiliate network’s postback field.
- Generate the offer URL in your affiliate network.
- Paste that link into your tracker’s “Offers” integration field.
- Create a tracking campaign in your tracker to gather all the previously added systems.
- Generate the tracking URL for your tracking campaign in the tracker.
- Add that tracking link into your ad network’s campaign as the “Destination URL”.
- What common postback setup errors should be avoided?
A common mistake when setting up postbacks is mismatching click ID parameters between the tracker and the network, placing the postback in the wrong field, failing to include required parameters like offer ID or status, and skipping testing before launching. Any of these issues can prevent conversions from being properly tracked and lead to wasted spend.